
In Odoo, ERP there is the possibility to configure a custom email. The configuration of outgoing and incoming email in Odoo is essential for companies to make the most of this functionality.
SinceOdoo configures its own email servers for the database, incoming and outgoing emails work immediately. Therefore, customers usingOdoo onlinedoOdoo.shnot need to configure anything.
Unless an external mail server is required to send large batches of mass emails, just use the standard Odoo online database, as it has been pre-configured to send emails.
Note: The Odoo server has a daily email limit to prevent abuse. The default limit is 200 emails sent per day for databases with anEnterprise. You can increase this limit under certain conditions.
Default system notifications
Documents in Odoo (such as a CRM opportunity, a sales order, an invoice, etc.) have a conversation thread calledchatter.
When a database user posts a message in the chatter, this message is sent via email to the followers of the document as a notification (except for the sender). If a follower replies to the message, the response updates the chatter and Odoo retransmits another response to the followers as a notification. Response messages to the chatter from users or external users will appear in the chatter of their respective email, or as the name that appears in their record.contact.
Manage outgoing messages
In Odoo, as a system administrator go to Settings ‣ General Settings ‣ Conversations and enable the option for custom email servers and click save. Then, select outgoing email servers and click create to create a new outgoing email server record in Odoo. Use the SMTP details of the external email server as a reference. Once you complete all the information, click on test connection.
Note: Delivery capability will improve if you ensure that the outgoing domain has configured elements such as SPF, DKIM, and DMARC in the DNS.
Use a default "From" email address
Sometimes, the "From" (outgoing) address may belong to a different domain, and this can be an issue.
For example, if a customer with the email address maria@cliente.ejemplo.com replies to a message, Odoo will attempt to redistribute that same email to the other subscribers of the thread. However, if the domain cliente.ejemplo.com prohibits this type of use for security reasons, the email that Odoo tries to redistribute will be rejected by the email servers of some of the recipients.
To avoid that problem, Odoo sends all emails that use a 'From' address from the same authorized domain.
You can access the system parameters by activating the developer mode and going to the menu Settings ‣ Technical ‣ Parameters ‣ System Parameters.
To force the email address from which emails are sent, you must set a combination of the following keys in the system parameters of the database:
- mail.default.from: accepts the local part or a full email address as a value.
- mail.default.from_filter: accepts a domain name or an email address as a value.
Note: mail.default.from_filter only works with odoo-bin configurations or with Odoo's default email server. Otherwise, you can set this parameter using the from_filter field in ir.mail_server.
The field can be a domain name, a full email address, or it can remain empty. If the sender's email address does not match the established filter, then the email will be encapsulated using a combination of the two system parameters: mail.default.from and mail.catchall.domain.
Example:
In the following example, the combination of the two system parameters (mail.default.from and mail.catchall.domain) replaces the email address "From". This is the default notification setting in Odoo: “Admin” <admin@example.com> => “Admin” <notifications@mycompany.com>.
That is, if the author's email address does not match mail.default.from_filter, the email address is changed to mail.default.from (if it contains a complete email address) or a combination of mail.default.from and mail.catchall.domain.
If from_filter contains a complete email address, and if mail.default.from is equal to that address, then all email addresses that are different from mail.default.from will be encapsulated in mail.default.from.
Use the "From" filter on an outgoing email server
The FROM filter field allows you to use a specific outgoing email server based on the From email address or the domain from which Odoo sends emails. You can use this setting to improve the delivery or success rate of emails sent from the database. You can also set the FROM filter field to send emails from different domains in a multi-company environment. You can access this field in Odoo under Settings ‣ Conversations ‣ Custom Mail Servers ‣ Outgoing Mail Servers ‣ New.
When an email is sent from Odoo while the FROM filter field is set, an email server is chosen according to the following sequence:
- First, Odoo looks for an email server with the same value for the FROM filter as the From value (email address) defined in the outgoing email. For example, if the From value (email address) is test@example.com, only email servers whose FROM filter value is equal to test@example.com are retrieved.
- However, if no email servers are found that use the From value, then Odoo will look for an email server that has the samedomainas the From value (email address) defined in the outgoing email. For example, if the From email address is test@example.com, only email servers whose FROM filter value is equal to example.com are retrieved.
If no email servers are found after checking the domain, then Odoo retrieves all email servers that do not have any FROM filter value or values set.
If this query returns no results, then Odoo performs a search for an email server that uses the system parameter: mail.default.from. First, the specified email address attempts to find a match with an email server, and then the domain attempts to find a match. If no email server is found, Odoo returns the first email server (according to priority).If multiple email servers are found, Odoo uses the first one according to its priority. For example, if there are two email servers, one with a priority of 10 and the other with a priority of 20, then the email server with a priority of 10 is the one that is used first.
Set up different dedicated servers for bulk and transactional emails.
In Odoo, a separate email server can be used for transactional emails and bulk emails. For example: use Postmark or SendinBlue for transactional emails, and Amazon SES, Mailgun, SendGrid or Mailjet for bulk emails.
Important
An outgoing email server has already been configured. Do not create an alternative unless you need to use an external outgoing email server for technical reasons.
To do this, first enable the developer mode and then go to Settings ‣ Technical ‣ Outgoing Mail Servers. There, create two outgoing email server settings: one for transactional emails and the other for the bulk mail server. Make sure to prioritize the transactional server by assigning it a lower priority number.
Now, go to Email Marketing ‣ Settings, enable the Dedicated Server option, and choose the appropriate email server. With these settings, Odoo uses the server with the lowest priority for transactional emails and the server you selected for bulk emails. Keep in mind that, in this case, you must set the Sender Policy Framework (SPF) records to include both servers, the transactional email server and the bulk email server.
Manage incoming messages
Odoo uses generic email aliases to retrieve incoming messages.
- Thereply messagesto messages sent from Odoo are routed to their original conversation thread (and to the inbox of all followers) using the model's alias if available, or using the catchall alias (catchall@). Replies to messages from models that do not have a custom alias will use the catchall alias (catchall@mycompany.odoo.com). However, the catchall address does not have additional actions like other aliases; it is only used to collect replies.
- Thereturned messagesare used as a return route. This is very useful in the Odoo Email Marketing application. In this case, returns are added to the exclusion list if the address has returned several messages (5) in the last month and if a week has passed between each return. This action aims to prevent inclusion on this list in case it is a mail server error. If the initial conditions are met, then the email is invalid and will be part of the exclusion list. The contact will have a log note in the section Email addresses included in the exclusion list in the Email Marketing settings menu.
Returned messages in the chatter (outside of Email Marketing) will have a red envelope indicating that delivery failed. This can be useful to know that a sales order or an invoice did not reach its final destination. - Original messages: various business objects have their own alias to create new records in Odoo from incoming emails:
- Sales channel (to createleadsoropportunitiesin the Odoo CRM application).
- Support channel (to createticketsin the Odoo Customer Support application)
- Projects (to create newtasksin the Odoo Project application)
- Job positions (to createcandidatesin the Odoo Recruitment application)
There may be several methods to search for emails depending on your mail servers. The simplest and recommended method is to manage one email address per Odoo alias on your mail server.
- Create the corresponding email addresses on the mail server (catchall@, bounce@, sales@, etc.).
- Set the alias domain name in Settings ‣ General Settings ‣ Conversations. Changing the alias domain will change the catchall domain of the database.
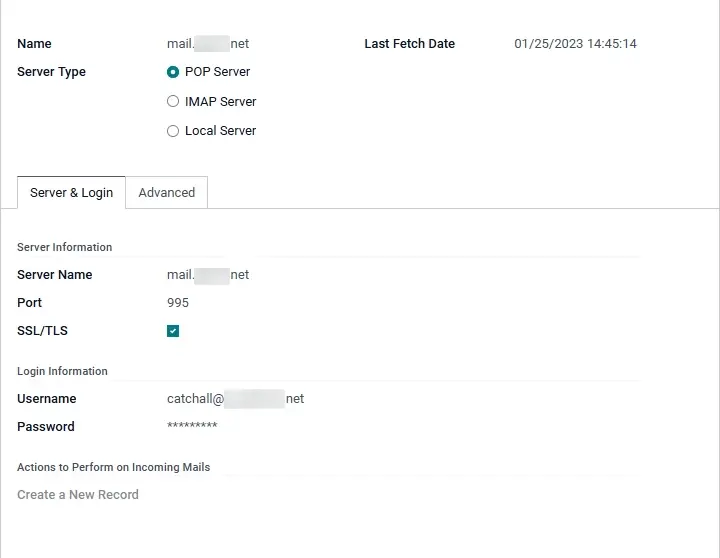
- If the database hosting type is local Odoo, create an incoming mail server in Odoo for each alias. You can create a new incoming mail server in Settings ‣ Conversations ‣ Custom Mail Servers ‣ Incoming Mail Servers ‣ New. Fill out the form according to the email provider's settings. Leave the actions to be taken on incoming emails field blank. Once you have completed all the information, click on TEST AND CONFIRM.
- If the database hosting type is Odoo Online or Odoo.sh, we recommend redirecting or forwarding incoming messages to the Odoo domain name instead of the external mail server. This way, you will receive incoming messages without delays. You must set up redirects for all email addresses to the Odoo domain name on the email server (for example, catchall@mydomain.ext to catchall@mycompany.odoo.com).
You can customize all aliases in Odoo. Object aliases can be edited from their respective configuration view in Settings ‣ Technical Menu ‣ Email ‣ Alias.
To edit the catchall and bounce aliases, first enable the developer mode. Then, go to Settings ‣ Technical ‣ Parameters ‣ System Parameters to customize the aliases (mail.catchall.alias and mail.bounce.alias), these changes must be made before starting to use the database in production. If a customer replies to a message after making a change, the system will not recognize the previous alias and will not receive the response.
By default, incoming messages are fetched every 5 minutes in Odoo databases with local hosting.
System parameters that prevent feedback loops
There are two system parameters that help prevent email loops in Odoo. These parameters were included in Odoo 16 to prevent aliases from creating too many records and thus prevent feedback loops in catch-all email addresses. They are present in the databases but not in theSystem Parameters. To override the following default values, you need to add them.
The two system parameters are:
- mail.gateway.loop.minutes (120 minutes by default)
- mail.gateway.loop.threshold (20 minutes by default)
Add these fields in Odoo by first enabling the developer mode, and then go to Settings ‣ Technical menu ‣ Parameters ‣ System Parameters. Change the value of those parameters as needed.
When an email is received in the Odoo database at the catchall email address or any other alias, Odoo checks the email it received for the time period specified in the system parameter mail.gateway.loop.minutes. If the received email was sent to an alias, then Odoo will reference the system parameter mail.gateway.loop.threshold and determine the value as the number of records that this alias is allowed to create in the specified time period (value of mail.gateway.loop.minutes).
Additionally, when receiving email at the catch-all address, Odoo will reference the emails received in the database during the established time period (as set by the value in the system parameter: mail.gateway.loop.minutes). Then, Odoo will determine if any of the emails it received match the email that is received during the specified time period, and this will prevent a feedback loop from occurring if a duplicate email is detected.
Allow the system parameter for domain alias
Incoming aliases are configured in the Odoo database to create records upon receiving emails. To view the aliases configured in an Odoo database, first enable the developer mode. Then go to Settings ‣ Technical ‣ Email Section ‣ Aliases.
The system parameter mail.catchall.domain.allowed, set with allowed alias domain values separated by commas, is responsible for correctly filtering emails directed to each alias. Configuring the domains where aliases can create a ticket, lead, opportunity, and other options eliminates false positives where email addresses with only the prefix alias (not the domain) are present.
In some cases, matches have been made in the Odoo database when receiving an email with the same alias prefix and a different domain in the incoming email address. This occurs in the email addresses of the sender, recipient, and CC of an incoming email.